Building the library from start to finish: I looked around my house and on fb marketplace for something I could turn...
Posted by Angela’s Little Free Library on Saturday, July 11, 2020
Wednesday, August 19, 2020
recent upcycle project: Little Free Library
Thursday, March 16, 2017
Over The Rainbow for this apron

http://www.sew4home.com/projects/kitchen-linens/kitchen-confections-modas-vintage-modern-pleated-apron
I tweaked the bib pieces of this pattern so that I could paint the rainbow on the bottom bib piece. The blue gingham is one of the pillow cases. The white fabric of the lining of the apron and the white clouds is scraps from an old flat sheet (you can see the original hem of the flat sheet sticking out of the bottom of the apron hem). The rainbow is also a piece of the sheet. I cut the pattern piece and sewed the darts, then painted on the rainbow with Jacquard Textile paints. It heat sets with an iron and is permanent and stays soft. The top bib piece is lightly quilted with a piece of thin flannel in between the layers.


 There are 3 cloud pockets (the original pattern has rounded rectangle
pockets with box pleats and I added the 3rd pocket on the waist)
There are 3 cloud pockets (the original pattern has rounded rectangle
pockets with box pleats and I added the 3rd pocket on the waist)

The skirt is 30" wide and there are 29" straps on both ends.
It took me about 2 hours from start to finish with several breaks in between ironing and sewing to entertain my 20 month old.
I will definitely be making more of these. Check my facebook page if you would like to purchase one from me. www.facebook.com/angelashippietreasures
Saturday, February 11, 2017
Never Enough Kale Salad recipe
I am obsessed with Kale salads. I've made several variations on this and change it a little each time but this time it was so good that I decided to record the recipe and share it with all of my adoring fans.
I started by cutting up the leafy parts of a few bunches of Kale. It looked like a lot. Massage the Kale, rinse the Kale, massage it some more. Make it uncomfortable. 
Next, I got some green vegetables: celery, green onion, cucumber, nopalitos, and jalapeno. Throw it randomly around in the bowl like this:

Then I added some carrots and tomatoes for color. Again, just throw them randomly into the bowl.

We had some leftover guacamole that consisted of several avocados, lime juice, tomatoes, cilantro, red onion, and jalapeno. It was about 2 cups of prepared guacamole. I just dumped it on top of the bowl of veggies. Then I sprinkles a very generous amount of this chili lime spice blend that I picked up at Ross.

Now, all this time, I had some quinoa cooking in my instapot (rice setting 1 cup quinoa, 1 1/2 cups water). I took it out and spread it onto a plate and put it in my freezer. Back at the bowl, I added some sesame seeds, chia seeds, and flax seeds (I realized while typing this up that I forgot Hemp seeds. I usually put in a lot of hemp seeds but I totally forgot). You will want a lot of these. Again, randomly thrown into the bowl...

I also added a good amount of olive oil and the juice of 2 small oranges to the bowl, then took the quinoa out of the freezer and threw it on top.

It was then that I realized my bowl was not large enough so I dumped everything into my bigger bowl and stirred it up. At the table, we topped our salad with a helping of Nutritional Yeast for a completely healthy and vegan meal.

Ingredients List: (all ingredients purchased at either Aldi or from Bountiful Baskets)
Kale
Cucumber
Celery
Green Onion
Nopalitas
Jalapeno
Carrots
Tomato
Guacamole (avocado, red onion, jalapeno, lime juice, salt)
Chili and Lime spice blend
Chia seeds
Flax seeds
Sesame seeds
Orange juice
Olive oil
Quinoa
Thursday, December 8, 2016
baby sweater pants! quick and easy tutorial
I have a giant bag of sweaters that I got at a thrift store for a quarter a piece last summer. I have now made 3 pair of pants from the sweaters for my 1 1/2 year old and for my 2 1/2 year old niece. You will need 1 adult size sweater, thread, a sewing machine, clips or pins, and scissors. You could also do this easily on a serger but my serger doesn't like the sweater material. She's very picky.
I chose a nice primary red cashmere sweater from my big bag for this tutorial and I am using black thread so you can easily see my stitching (and because my machine was already threaded). The sweater had a few moth holes right in the center of the front and back but I will be using the sleeves and the neckband from this sweater.
My machine is a vintage singer 401 A (and I love it so so so much).

 (tag and moth hole)
I start by cutting off both sleeves at the armpit as close to the seam as possible.

Next, I decided that the neck band on this sweater would be perfect for the waistband of the pants so I cut it off, leaving about 1/2" away from the band to have a little seam allowance.

 If your sweater doesn't have a nice neckband like this, you can also use the bottom edge of the shirt. Depending on how stretchy your knit sweater is, you will make the waist band to fit your baby's waist snugly. You can also make a yoga style waistband that will fold over, but for this tutorial, I wanted to make it very simple.
 This is what I have left over from cutting the pieces off. There is plenty of sweater here to make mittens or a hat or even a matching tiny baby sweater, so I will put this back into the bag of sweaters in my craft room (waste not, want not).
Now that all your pieces are cut, turn the sleeves inside out and you want to cut part of the seam of the sleeves off at the top so that you can make the crotch of the pants and sew the 2 sleeves together. I just eyeball it to make it the right length. If you aren't sure how much to cut, just put a pair of pants that fits your child well down next to it and judge from there how much to cut. In my picture, my scissors are laying at the point where I will cut the seam off. The second picture shows the seam cut off and my little helper getting all up in my business (as usual).


Now, you should turn one of the sleeves right side out again and slip it into the other sleeve to match up the seams.


Now pin or clip the crotch together and sew. I use a straight stitch and then reinforce the seam with a zig zag stitch in the seam allowance. Then trim the seam close to the zig zag. (if you use a serger, you don't have to go to all that trouble, just serge). I personally like this finish better than the serger for this type of fabric because it tends to ruffle with a serged edge.

(isn't that a beautiful machine?)

Now you are ready to add your waistband. Pull the pants out and keep them inside out, then slip the waistband upside down into the pants so that the right side of the waistband is facing the right side of the body of the pants.
 You want to pin at the seams and sides. You will have to stretch the waistband to fit the top of the pants, which should be a few inches bigger. I pinned mine in 4 places. Then you need to stretch as you sew this on so you don't get any accidental pleats.
Again, sew with a straight stitch, then a zig zag in the seam allowance and then clip the excess off. I am sewing right on the very edge of the cuff.


stretch so that the waist band fits the opening in the pants. Sew with the inside of the pants facing up unless you have a long free arm machine. The second picture shows the waist sewn in with a straight stitch. The pictures below are my zig zag stitch and the finished clipped seam.


Now the pants are done! Wasn't that quick and easy?
 Now take a few pictures of them in action:
Maxwell is wearing them with the bottom cuffs rolled up. He has plenty of room to grow and these will probably fit him next winter as well.

Let me know if you make some upcycled sweater pants!
I chose a nice primary red cashmere sweater from my big bag for this tutorial and I am using black thread so you can easily see my stitching (and because my machine was already threaded). The sweater had a few moth holes right in the center of the front and back but I will be using the sleeves and the neckband from this sweater.
My machine is a vintage singer 401 A (and I love it so so so much).


I start by cutting off both sleeves at the armpit as close to the seam as possible.

Next, I decided that the neck band on this sweater would be perfect for the waistband of the pants so I cut it off, leaving about 1/2" away from the band to have a little seam allowance.


Now that all your pieces are cut, turn the sleeves inside out and you want to cut part of the seam of the sleeves off at the top so that you can make the crotch of the pants and sew the 2 sleeves together. I just eyeball it to make it the right length. If you aren't sure how much to cut, just put a pair of pants that fits your child well down next to it and judge from there how much to cut. In my picture, my scissors are laying at the point where I will cut the seam off. The second picture shows the seam cut off and my little helper getting all up in my business (as usual).


Now, you should turn one of the sleeves right side out again and slip it into the other sleeve to match up the seams.


(isn't that a beautiful machine?)

Now you are ready to add your waistband. Pull the pants out and keep them inside out, then slip the waistband upside down into the pants so that the right side of the waistband is facing the right side of the body of the pants.

Again, sew with a straight stitch, then a zig zag in the seam allowance and then clip the excess off. I am sewing right on the very edge of the cuff.


stretch so that the waist band fits the opening in the pants. Sew with the inside of the pants facing up unless you have a long free arm machine. The second picture shows the waist sewn in with a straight stitch. The pictures below are my zig zag stitch and the finished clipped seam.


Now the pants are done! Wasn't that quick and easy?

Maxwell is wearing them with the bottom cuffs rolled up. He has plenty of room to grow and these will probably fit him next winter as well.

Let me know if you make some upcycled sweater pants!
Monday, July 27, 2015
Dyed Galaxy Ergo Baby Carrier
I got this Galaxy Ergo for super cheap on ebay because it had a few stains and was old and worn. Still in great condition for carrying a baby and a great dye blank! I tried to find some information about how to dye this carrier but couldn't really find a good tutorial, so I decided I would document everything I did and write my step-by-step instructions for other people. I am currently wearing my 11 day old baby in the finished dyed Ergo while I type this post!
Here is the carrier before I dyed it, complete with stains.


I rolled up all of the loose straps and unbuckled everything so I would have extra stuff flopping around. I left my carrier in the soda ash solution for approximately an hour.
I also wore my galaxy leggings for color and placement inspiration.


Here is my setup for dyeing. It's a cheap plastic bin, some tall beer cans, and some cooling racks. Very professional. I clean the grates and the inside walls of the bin each time I dye something.

*wearing gloves* Ring out the carrier as much as you can so you don't waste precious soda ash, then put it in the washing machine on a spin cycle to get the excess moisture out.
 I mixed 4 colors. I used Dharma Procion MX dyes and I mix them about 1/2 of a tsp per cup or so of water. I just mix them in my jars or squirt bottles. I already had the green and fuchsia mixed up (green is turquoise and lemon yellow mixed in even amounts, but I ended up not using any green at all). From left to right: Jet black, Jet black, green, fuchsia, turquoise, and the last jar is a dark purple. To make that color, I mixed 1/4 tsp of fuchsia, 1/4 tsp of turquoise, and 1/8 or so tsp of black. Always mix dyes with cold water. (also, this didn't use near as much dye as I thought it would, so I still have some of every color but fuchsia mixed and ready to dye something else. Dyes keep quite well as long as it's cool where you store them.

I laid the carrier loosely in the bin. It didn't really matter how because I maneuvered it a lot while I was slinging the dye on.
I started with the lightest color, fuchsia. I just put it on in random spots.
After I was "done" with the outside of the carrier, I flipped it over and put some pink on the back side as well so the whole carrier had dye.

...then the turquoise, again on both sides
.... then the purple

... and last the black. The black was the most fun because I just shook it all over the carrier.
I placed the carrier carefully into a black trash bag and flattened it out as best I could, then took the bag outside to batch for 24 hours in the heat of our Oklahoma summer. this was about 3:00 on Saturday, so it would be ready for me to rinse out after lunch on Sunday.
Sunday after lunch and a short nap, I opened the black trash bag and saved it to use for trash and started rinsing. I have a utility sink in my back yard that isn't hooked up to anything and I just use the garden hose to rinse my dye jobs. This one took a LOT of rinsing. I think I was rinsing this for at least 30-40 minutes. Just like dyeing your hair, you want to keep rinsing until the water runs clear.


I took the carrier inside and put it in the washing machine with a drop of blue dawn dish soap and my homemade laundry detergent (ingredients: grandpa's patchouli soap, borax, super washing soda, tea tree oil, and water), set it to wash a small load on hot, with extra power rinse.
I hung it outside to dry.
 I could not wait to get that carrier inside and put my tiny little boy in it. I have a borrowed infant insert and he fits perfectly. I may paint more stars on it or do something decorative on the hood, but I really love the way it turned out and I'm not sure it needs anything else. I also got my 3 year old in it on my back but he wasn't dressed appropriately for public pictures, so these are my only action shots for now.

Happy upcycling!
Here is the carrier before I dyed it, complete with stains.


I started by mixing a little more than 1 cup of soda ash with a gallon or so of water. You will come to find in this tutorial that I rarely measure anything out. I just wing it. It's not rocket science. I have this big canning pot just for my chemicals. If you don't have one of these, you can use a clean cooler, bucket, stainless steel sink, etc. I use my canning pot and I re-use my soda ash until the water is either too dirty or gone.


I rolled up all of the loose straps and unbuckled everything so I would have extra stuff flopping around. I left my carrier in the soda ash solution for approximately an hour.
I also wore my galaxy leggings for color and placement inspiration.


Here is my setup for dyeing. It's a cheap plastic bin, some tall beer cans, and some cooling racks. Very professional. I clean the grates and the inside walls of the bin each time I dye something.
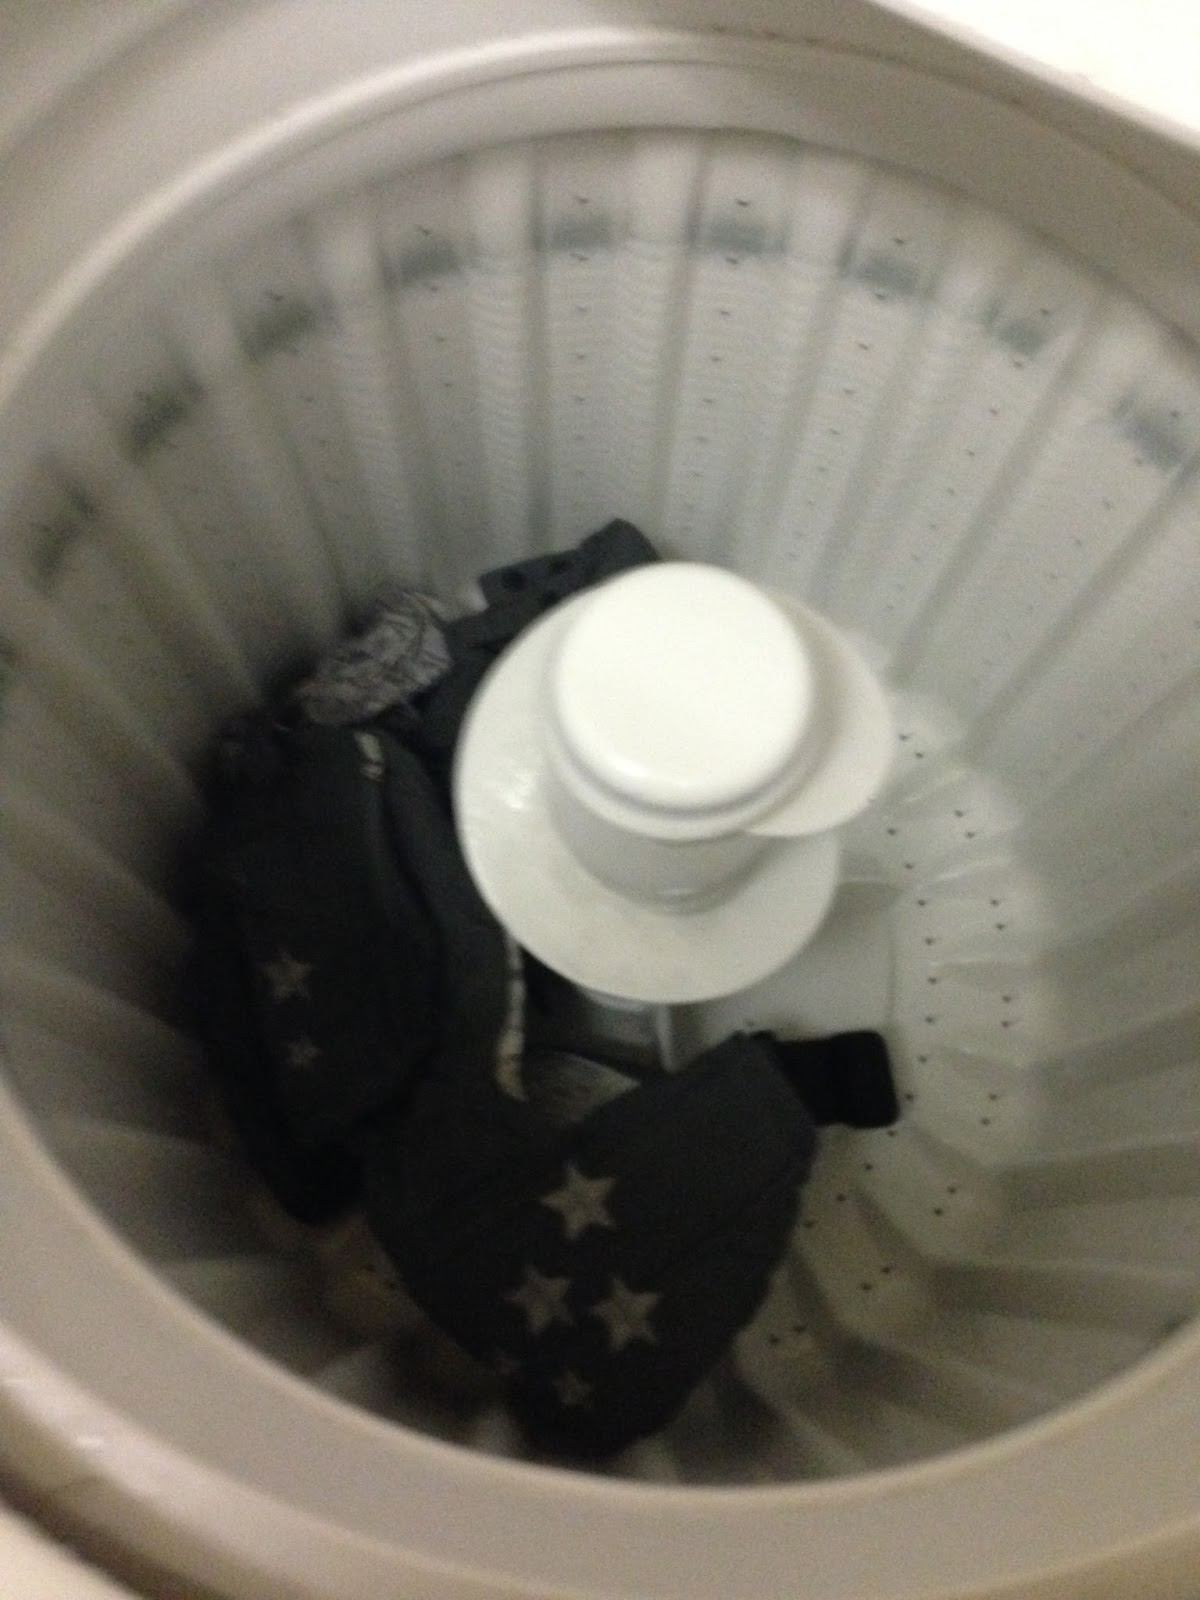
*wearing gloves* Ring out the carrier as much as you can so you don't waste precious soda ash, then put it in the washing machine on a spin cycle to get the excess moisture out.


I laid the carrier loosely in the bin. It didn't really matter how because I maneuvered it a lot while I was slinging the dye on.

I started with the lightest color, fuchsia. I just put it on in random spots.
After I was "done" with the outside of the carrier, I flipped it over and put some pink on the back side as well so the whole carrier had dye.


...then the turquoise, again on both sides
.... then the purple

... and last the black. The black was the most fun because I just shook it all over the carrier.

I placed the carrier carefully into a black trash bag and flattened it out as best I could, then took the bag outside to batch for 24 hours in the heat of our Oklahoma summer. this was about 3:00 on Saturday, so it would be ready for me to rinse out after lunch on Sunday.
Sunday after lunch and a short nap, I opened the black trash bag and saved it to use for trash and started rinsing. I have a utility sink in my back yard that isn't hooked up to anything and I just use the garden hose to rinse my dye jobs. This one took a LOT of rinsing. I think I was rinsing this for at least 30-40 minutes. Just like dyeing your hair, you want to keep rinsing until the water runs clear.


I took the carrier inside and put it in the washing machine with a drop of blue dawn dish soap and my homemade laundry detergent (ingredients: grandpa's patchouli soap, borax, super washing soda, tea tree oil, and water), set it to wash a small load on hot, with extra power rinse.
I hung it outside to dry.


 I could not wait to get that carrier inside and put my tiny little boy in it. I have a borrowed infant insert and he fits perfectly. I may paint more stars on it or do something decorative on the hood, but I really love the way it turned out and I'm not sure it needs anything else. I also got my 3 year old in it on my back but he wasn't dressed appropriately for public pictures, so these are my only action shots for now.
Happy upcycling!
Subscribe to:
Posts (Atom)